


Another Crab’s Treasure has a number of fantastic yet challenging bosses for players to defeat. Here are all the mandatory and optional bosses Kril will have to face.
As players journey across the ocean in Another Crab’s Treasure, various bosses will try to get in your way. Although you may have your Fork upgraded or your perfect shell selected, they can still be tough. Fortunately, we provide you with a list of all the bosses in Another Crab’s Treasure, both mandatory and optional. That way, you are prepped ahead of time for who to look out for and what you will face.
*Disclaimer: This article contains boss information, which could be considered spoilers.
How Many Bosses Are There In Another Crab’s Treasure?
Players will have a total of 18 various bosses to defeat in Another Crab’s Treasure, with five being optional. Some are quick in speed and attacks, while others are slow but deal massive damage. Players need to take caution when fighting any of these bosses, as they could lose their trusty shell and need to get it back. Make sure to look out for Stainless Relics on your adventure, as they will help you deal more damage to the bosses. Below are all of the bosses in the game.
Every Mandatory Boss in Another Crab’s Treasure
There are 13 mandatory bosses that players must overcome during the story of Another Crab’s Treasure. Because these are mandatory, players will encounter them as they progress, and of all 13, only three have a second phase. Here is the complete list of mandatory bosses in the game:
Nephro, Captain of the Guard
- Location: The Shallows. Near the castle of Duchess Magista, Tyrant of Slacktide.
Nephro is a slower boss to fight, equipped with a large sword. Many of his attacks are swings, so players should look for their wind-up and be ready to dodge. It is best to attack Nephro at either of the sides or behind to do damage and avoid being hit.

Duchess Magista, Tyrant of Slacktide
- Location: Insides of Slacktide Castle.
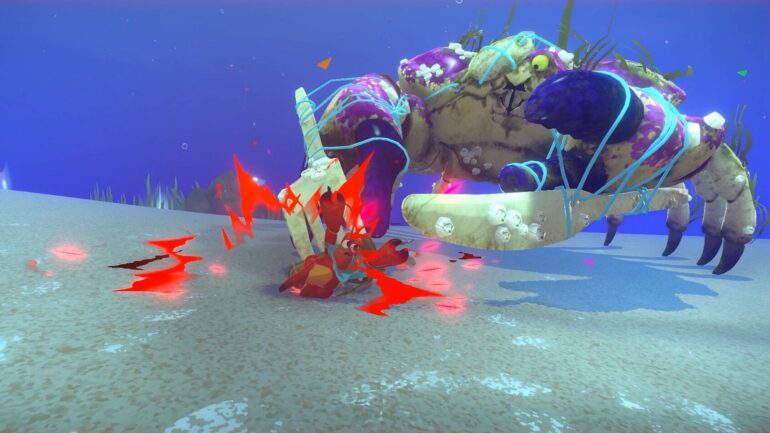
Magista is a massive crab that players encounter in Slacktide Castle. One of her primary attacks is a big chained weapon she swings outwards, so be ready to evade. Additionally, she uses her one claw to slam down and deal damage, so be prepared for that. Players can deal damage to her anywhere, preferably on the front side of her. Taking down the Duchess will reward players with the Royal Wave Adaptation.

Diseased Licenthrope
- Location: Expired Grove. At the entrance to the area, the fight will commence.
The Diseased Licenthrope has a jump attack that will see it attempt to land on you. Aside from the damage from impact, players must avoid its area-of-effect as a disease will litter a small area and damage you further. The enemy is slower moving but will try and suck you in with a vacuum-like ability, along with swipe attacks. It is damageable anywhere on the body, but it is best to attack the front to anticipate any attacks.

Heikea, Intimidation Crab
- Location: Village Gates, Expired Grove.
Heikea has an unbroken set of chopsticks (yes, those chopsticks) that function as a greatsword-style weapon. Along with a typical slash attack, Heikea will try to punch you with its left claw if you remain close for too long. During the fight, Heikea will break the chopsticks into two and use both as cleaving attacks, so watch out for more than one slash near the latter half of the fight. Defeating Heikea will grant players a piece of the map needed in the story.

Pagurus, the Ravenous
- Location: The Sands Between. At the entrance to the area, the fight will commence.
Pagurus is a large crab with both a fork and knife attached to its claws. It will try to deal damage through large spin attacks. Furthermore, it does combos of 4-5 attacks, alternating between arms and ending with an arm stabbing into the ground and flinging up to hit you. Players can attack Pagurus anywhere, but it is usually best to fight it in the front as with other bosses. Taking down Pagurus gives you one of the required map pieces in the story.

The Ceviche Sisters
- Location: Shipping Porta area, Flotsam Vale.
The Ceviche Sisters are a tougher fight as there are two bosses to contend with in the arena. Both bosses use the same ranged attacks, one being a fire wave that goes out in front. The other is a fire bolt that shoots toward you, so it is best to go after one sister and get her out of the way before taking down the second. Defeating The Ceviche Sisters gives you the final treasure map piece as well as the Bubble Bullet Adaptation.

Voltai, the Accumulator
- Location: Mag-Rail Platform, Flotsam Vale.
Voltai is a gigantic eel. The fight is very straightforward, as Voltai will use various items to attack, including ranged projectiles with a blow dryer. After its attack phase, the boss will charge out of its corner and disappear into another pile of garbage. It will reappear in a different garbage pile corner, so look for these areas. The only place to attack Voltai is in its face. The reward for beating Voltai is the Electrocute Adaptation.

Roland, Venture Crabitalist
- Location: The Mouth of the Drain.
Roland uses a one-handed attack weapon and slashes at you with his three free arms. The boss will also roll up into a ball and try to roll over you around the arena, so be ready to dodge to the side when he does.

Petroch, the False Moon
- Location: The Unfathom.
Petroch is a fake Moon Snail Checkpoint you come across in the game. A notable attack that Petroch does is a ground pound that spawns crystals. These crystals will try to rise under you to damage you, so watch your feet. Many of its attacks involve jumping into the air to either slam onto or slash you, so whenever you see it jump up, be prepared for an attack. Conquering Petroch gives you two rewards: the ability to use teleports worldwide and the Snail Sanctum Shell.

Inkerton, Crab Hunter
- Location: The Unfathom.
While he may look like the Hunter from Bloodborne, Inkerton is anything but a hero. Inkerton uses a tool as a slashing weapon and a battery to shoot at you. Furthermore, he will use ink to hide himself, so staying out of his cloud is best. It is best to do a 1,2 hit combo and back away.

Praya Dubia, the Ocean’s Agony & Praya Dubia, the Final Scream
- Location: The Old Ocean
Praya will deploy minion crabs that you must dispose of fast while dodging the bombs it drops on you from above. After a bit, it will lower down, and you must strike the character it holds to deal damage. Once the bar is depleted, its second phase will begin, and Praya will become Praya Dubia, the Final Scream. The best action for this phase is to dodge its ranged attack onslaught continuously. This phase of the boss will slowly be losing damage, so staying alive is your best option.

Camtscha, the Bleached King & Camtscha, Reborn
- Location: The Old Ocean
Camtscha, in its first phase, “the Bleached King,” is a stationary boss. Players must deal damage up close and avoid the ground slam move that shakes the floor. Additionally, it will use its weapon in a slash motion to damage you. However, in its second phase, it becomes Camtscha, Reborn, and is more mobile. Players need to be aggressive and attack its face to stun it often and never let it get its attacks out.

Firth, the Crab Who Stole The Whorl & Firth, Avatar of Waste
- Location: Trash Island.
Firth has a varying moveset in the first phase. It will use its Shell for defense and, when ready to strike, will accumulate junk on its weapon to create a massive cleaving weapon to hit with. In phase two of the fight, called “Avatar of Waste,” Firth will spawn tentacles from its Shell. These will swing simultaneously with Firth to attack the player, so be ready to dodge or block. The main place to attack is the Shell when Firth is stopped for a few seconds.


Every Optional Boss in Another Crab’s Treasure
Players can encounter five additional optional bosses off the beaten path in Another Crab’s Treasure. They are located in three different areas, and players must go to different spots to locate them. Below are the optional boss fights in the game:
Royal Shellsplitter
- Location: The Shallows. Players can find the Royal Shellsplitter by trekking south of where the Nephro boss fight takes place.
The Royal Shellsplitter is a moderate-pacing enemy, so it’s best to land a couple of hits and back off. The boss uses a bike lock as a weapon and will swing with it and slam it if you are close enough. Additionally, the Shellsplitter uses its free hand to swipe at you, so be sure to dodge that. Winding up attacks as the boss finishes an attack motion to maximize timing is best.

Curdled Carbonara Connoisseur
- Location: Rainbow River in the Expired Grove. There is a waterfall; be sure to go behind it. Continue along the path, through the bottles, and you will encounter the boss.
The Connoisseur wields a big sword and shield combo. Players must focus their attacks on the back side to make their efforts count. The boss uses the melee weapon in a swiping motion and a jumping slam attack, so make sure to be ready for each move.

Grovekeeper Topoda
- Location: Topoda’s Garden, Expired Grove. Go to the upper end of the Heikea boss fight arena (the ship). Located below is a sandy shelf. Jump and land on it, then venture to the Curdled Village through a cave. Pass through the area to find Chitan outside the Topoda boss fight and proceed into the Garden.
Topoda is a punching-style enemy. The Grovekeeper has various moves to use, including close-range punches, a large sweep attack, and a quick series of punches that can be dodged backward. The main focus is to stagger Topoda to deal massive damage and finish the fight faster. Beating the boss rewards players with the Mantis Punch Adaptation and the ability to upgrade Adaptations.

The Consortium
- Location: Flotsam Vale. The best way to go is to take the path down the lower end of the ship in the Heikea boss fight arena. Go through the archway and then take the left path towards the Purple Umami Block, break it, and continue. When you get to the area with two platforms, go to the one on the left where hooks are dangling and grapple to them. Go on the path, jumping onto the different platforms and straight onto the ledge. Open the shortcut, but continue down the ledge path to a new area where the boss will be.
The Consortium is a monstrosity-type boss that moves slower than others. While it may seem daunting, the fight is simple. Players must attack and break all of the green ropes holding the cage together to defeat the boss. Some are located on the top, and players must use the hooks in the arena to get to them. Players receive the Tactical Tentacle Adaptation for beating this boss.

Scuttling Sludge Steamroller
- Location: Shipping Port in Flotsam Vale. The boss is located in the center of all of the platforms in the area.
The Steamroller is another sword and shield enemy. Players have to worry about its paint roller melee weapon instead, however, as the boss will charge you with it. The best time to strike the boss is when it turns to commence another attack, and then you can hit it from the sides.

That is everything to know about all of the bosses in Another Crab’s Treasure. If you wish to learn more about the game, head over to our Guide Hub for more articles like this one.